Custom Data Entry Forms
UPDATE: There is a newer version of this article. Please see Custom Data Entry Forms
With iGIS you are able to design your own customized data entry forms, making data entry so much easier. What you can do with customized forms is:
- rename form fields to be more readable,
- set default values for fields,
- add a help prompt,
- use a date/time picker,
- use code lists to select from a set of values with readable text
You define the format of the data entry form in an XML file, which is imported along with the data. This file is of type .glc and have the same name as the shapefile.

The .glc file defines information for each shapefile attribute so that a nice data entry form can be produced.
To start using customized forms, we recommend that you follow the following steps:
- Step 1. Download the below linked sample glc shapefile data and become familiar with the format by; investigating the file in a text editor, importing it into iGIS, editing the shapefile in iGIS.
- Step 2. Use the data export to create a *.glc template for your own shapefile data.
- Step 3. Edit your iGIS created *.glc template file with a text editor to add lookup code lists. Use the sample *.glc file from step 1 as a syntax reference.
- Step 4. Import your shapefile into iGIS with your *.glc file, and begin editing your data with codelists.
Sample Form
We’ve produced a sample .glc file which is available here; FieldPoints2.zip
Use these samples to create your own customized forms. The sample data entry form is:

Exporting .glc Files
You can export .glc files by using the Data Export screen
Reference Information
What field types are supported for iGIS *.glc files?
A full listing of supported field types can be found here; All supported field types
Readable Names
Instead of seeing the shapefile names, which can be truncated, you can show a readable name by using readable-name=”Nice Name”.
Identifiers
You can define an attribute as a unique identifier. this will usually be a number, denoted by the data-type of ‘N’. Set the field-type of ‘AutoIncrement’ to automatically produce the next highest number.
<Attribute column=”Id” readable-name=”Identifier”>

<Value data-type=”N” length=”6″>

<field-type>AutoIncrement</field-type>…
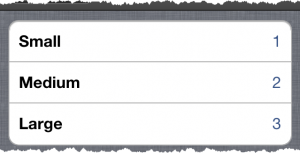
Code Lists
Use code lists to show readable values instead of codes in your forms. For example, the code list below will show ‘Small’ instead of ‘1’ in the form. Note that this code list has a name, in this case ‘SizeCodes’, which will be used by the attributes.
<CodeList name="SizeCodes" type="N" length="1">

   <value code="1">Small</value>

   <value code="2">Medium</value>

   <value code="3">Large</value>

</CodeList>
To use a code list, in the attribute set the field-type to ‘CodeList’ and the field-param to the code list name.
<Attribute column="ShortInt" readable-name="Size">

<Value data-type="N" length="4">

<field-type>CodeList</field-type>

<field-param>SizeCodes</field-param> ...
Default Values and Prompts
For text and number fields, use default to set a default value for the field. If you don’t set a default, you can set a prompt for the field, to aid data entry.
You can’t use both default values and prompts. Default values don’t work with codelists.
Dates
As the date type in shapefiles only hold dates, not times, we recommend that you use a text field to hold dates, which contains both dates and times. Use at least a 25 character field with field-type of ‘Date’. Setting the default value to current will mean that the timestamp is autopopulated when the attribute edit window is invoked in the App.
<Attribute column="Timestamp" readable-name="Timestamp">

<Value data-type="C" length="25">

<field-type>Date</field-type>

<default>current</default>

</Value> ...